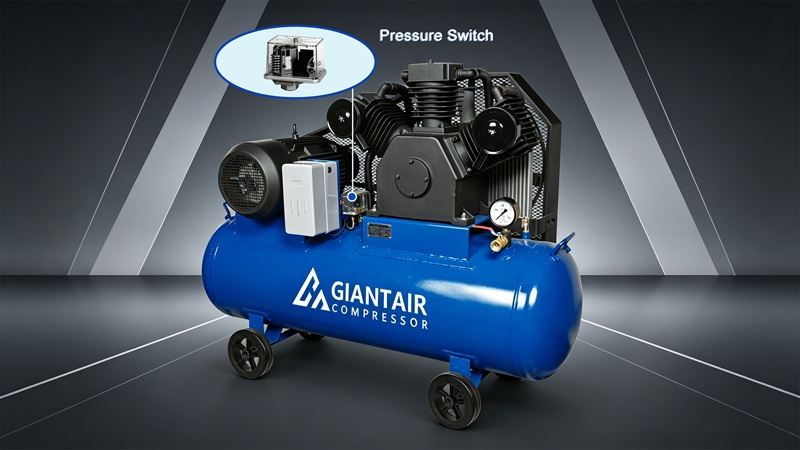
Overview of Air Compressor Pressure Switch
A pressure switch is a device that turns your compressor motor on and off based on the air pressure inside your tank.
It is the control center that keeps your system running smoothly and safely. When pressure drops too low, the switch tells the motor to start pumping. When pressure gets too high, it shuts the motor down. Pressure switches also help protect motors from thermal overload and prevent tank explosions caused by overpressurization.
This back-and-forth cycle prevents your tank from over-pressurizing while reducing unnecessary energy waste. The right pressure settings—called cut-in and cut-out points—are what make this whole system work.
We’ll walk through how to set those numbers and why the difference between them, called differential pressure, actually matters.
Why Correct Pressure Settings Matter
Set your pressure too high and you’re burning money. Every time your compressor pump works harder to reach a higher pressure, it uses more energy. increasing operating costs and putting extra strain on the system. This matters even more because air compressors already account for about 10% of industrial sector energy use, so inefficient pressure settings can significantly increase overall energy waste.
Your electric bill climbs. The motor runs longer and hotter. Over time, that heat breaks down parts faster. You end up replacing springs, seals, and valves sooner than you should.
Set it too low, and your tools won’t operate properly. A nail gun needs a certain minimum pressure to fire. A paint sprayer needs enough air line pressure to atomize paint smoothly. Miss that mark, and you get weak performance, or nothing works at all.
The real trick is matching your pressure settings to what you actually need. Here’s what changes when you get it right:
- Your tools perform the way they’re designed to
- Your motor doesn’t waste cycles running unnecessarily
- Your system lasts longer because parts experience less strain
- Energy costs stay reasonable instead of creeping up
Think of it this way: a smaller spring in your pressure switch costs almost nothing. Running your compressor at the wrong pressure for years costs you real money and reliability.
The differential pressure, also called the deadband, is the gap between the cut-in and cut-out pressures—typically around 20–40 PSI—and it controls how often the pump cycles. A tighter differential leads to more frequent cycling and increased wear on the system.
A wider differential means fewer cycles but a larger swings in tank pressure. Finding the right range for your specific machine model and application is what separates a system that operates properly from one that’s constantly working against itself.
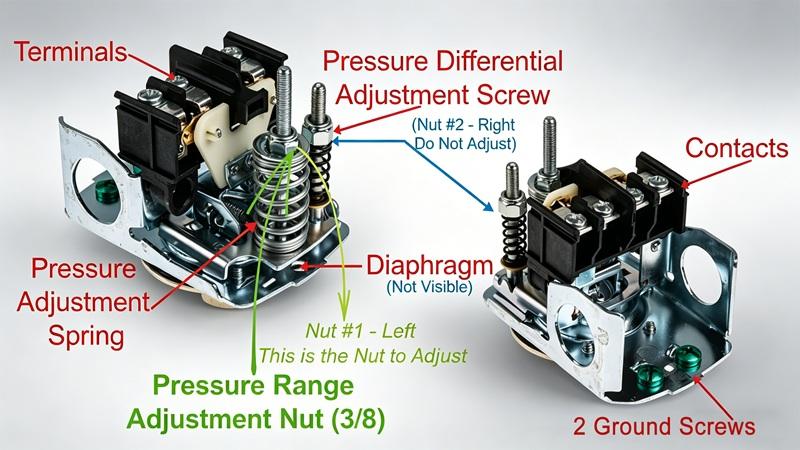
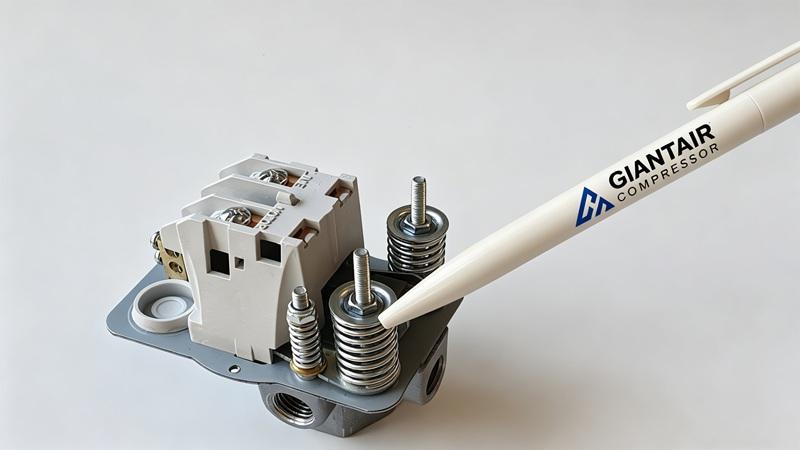
Key Components of a Pressure Switch
A pressure switch has just a few moving parts, and each one does something specific.
- Adjustment spring — controls the tension that sets your pressure points
- Diaphragm — senses the air pressure inside your tank
- Electrical contacts — open and close the circuit to start and stop your motor
- Terminals — connect the switch to your power supply
The spring holds tension. The diaphragm feels the pressure. When pressure rises high enough, the diaphragm pushes back and the contacts open—the motor shuts off. When pressure drops, the spring pushes the diaphragm back, the contacts close, and the motor starts again. The adjustment screw is what you turn to change the spring’s tension and shift your cut-in and cut-out pressure points. The switch itself must also have a maximum, or proof, pressure high enough to handle pressure spikes without damage.
Some compressors also have a pressure relief valve or unloader valve attached to the switch for added safety and efficiency. In many systems, the unloader releases trapped air between the pump and check valve when the contacts separate as the compressor shuts off, relieving residual pressure and making motor restarts easier. Pressure switches may also come in single-port or four-port manifold designs, allowing additional accessories to be mounted.
Depending on the application, switches can be mechanical or electronic. Mechanical switches are robust and suited for higher voltages, while electronic switches offer greater accuracy and programmable control features.
How an Air Compressor Pressure Switch Works
Your pressure switch does two things at once: it senses what is happening mechanically and it controls what happens electrically.
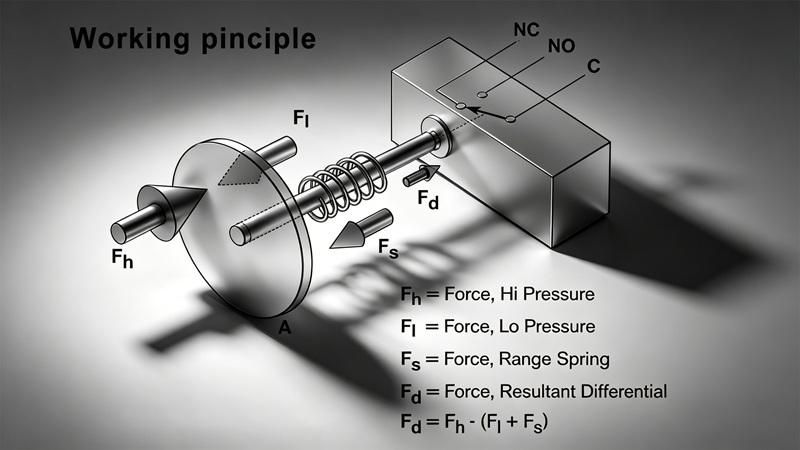
On the mechanical side, air pressure pushes up on the diaphragm, while the adjustment spring pushes down. When air pressure pushes hard enough, the diaphragm moves and trips the electrical contacts. When the spring pushes back, it trips them the other way. This back-and-forth is what makes your compressor cycle on and off. In many pressure switches, the main spring adjusts the cut-in and cut-out values proportionally, while a secondary smaller spring adjusts hysteresis, or the gap between those pressure points.
On the electrical side, those contacts are connected to your motor through a power supply circuit. When the diaphragm moves one way, the contacts close and electricity flows to your motor, so it starts pumping. When the diaphragm moves the other way, the contacts open and electricity stops, so the motor shuts down. It is a simple but effective control process.
Cut-In and Cut-Out Pressure Explained
Your pressure switch has two pressure set points. Understanding what they do is the foundation of getting your air compressor to operate properly.
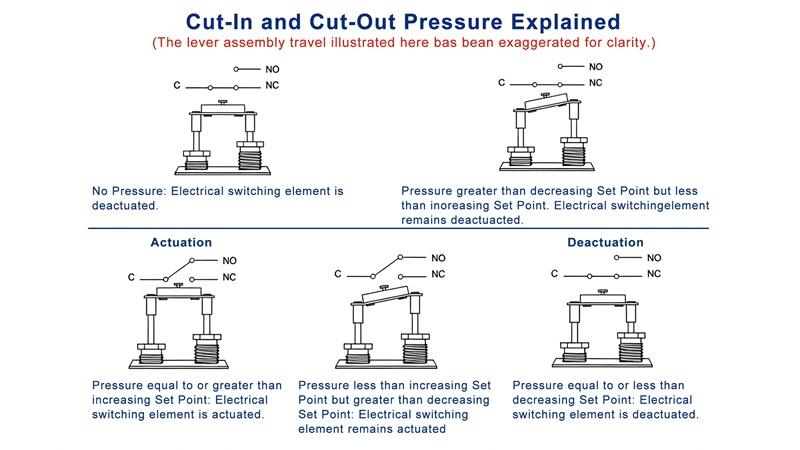
Cut-in pressure is the lower limit. It’s the minimum pressure where your compressor pump kicks on. When air pressure drops to this point, the spring tension releases and the electrical contacts close. Power flows to your compressor motor and the pump starts producing air again. Think of it as the signal that says “we need more air.”
Cut-out pressure is the upper limit. It’s the maximum pressure where your compressor motor shuts down. When air pressure climbs to this point, the diaphragm pushes back hard enough to open the electrical contacts and kill power to the motor. The pump stops. Think of it as the signal that says “we have enough air now.”
The relationship between these two numbers is called differential pressure, or hysteresis, which is the gap between the cut-in point and cut-out point. The cut-in pressure is always lower than the cut-out pressure. For example, a typical pressure switch may have a cut-in around 80 psi and a cut-out around 100 psi, creating a 20 psi differential. This pressure difference helps control how the compressor cycles during operation.
This difference controls how often your pump cycles. If the difference between the cut-in and cut-out pressure is too small, the compressor will quickly start and stop repeatedly, causing the motor to run more frequently and increasing wear.
A larger differential means longer stretches between cycles. The right pressure range depends on your machine model and what tools you’re running on your air line.
A desired cut-in pressure for one setup might be wrong for another. The adjustment screw on your switch lets you shift both set points up or down, and the spring’s tension controls the differential.
Turn the screw clockwise to increase pressure. Turn it counterclockwise to decrease pressure. This is how you find the right pressure for your system and keep everything running smoothly without excessive heat or energy waste.
How to Adjust Air Compressor Pressure Switch
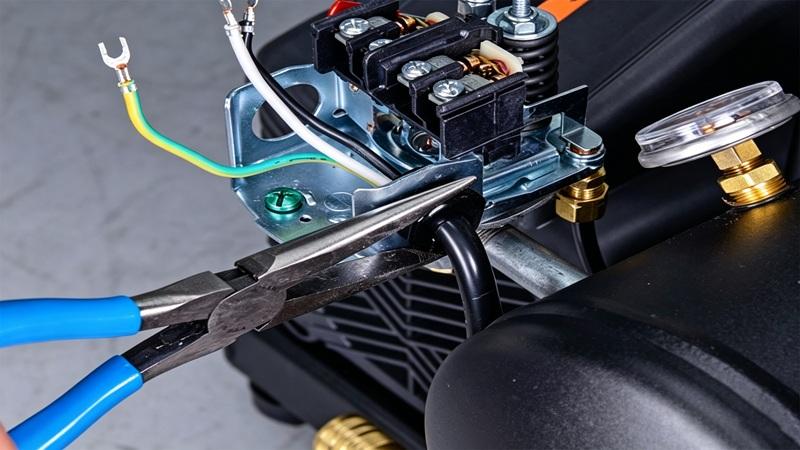
Safety Preparation
First, it is important to ensure safety. Before you touch anything on your pressure switch, shut down your system completely. Disconnect the power supply. Flip the breaker or unplug the machine. Wait a few minutes to let everything settle.
Next, drain your tank. Open the drain valve at the bottom and let all the air out. This removes the pressure that’s pushing on your diaphragm right now.
You need zero pressure in the tank before you adjust anything, otherwise the tension won’t read correctly and you could get hurt if pressure releases suddenly.
Once the tank is empty and the power is off, carefully remove the cover on your pressure switch. Most covers are held on with a couple of bolts or screws. Keep track of them so you don’t lose them. Be gentle—these aren’t heavy-duty parts and they can crack if you force them. Now you can see the adjustment screw and the springs inside. You’re ready to make your adjustment.
Adjustment Steps
Start with your main adjustment screw. This controls your cut-in pressure—the lower limit where your compressor pump kicks on. Turn the screw clockwise to increase pressure. Turn counterclockwise to decrease pressure. Make small changes only. A quarter turn at a time is plenty. You’re looking for your desired cut-in pressure.
Most pressure switches allow you to adjust the cut-in and cut-out values proportionally by changing the tension on the main spring, which shifts both pressure set points together. Some pressure switches also include a secondary spring that adjusts the cut-out pressure, or differential, without affecting the cut-in setting.
Next, adjust the differential screw if your switch has one. This sets how far apart your two pressure set points are. It controls your cut-out pressure—the upper limit where the motor shuts down. Again, small adjustments. A quarter turn makes a difference.

Always make incremental changes. Check your pressure gauge after each adjustment. It’s easy to overshoot and then you’re chasing the right setting back and forth.
Testing and Verification
After adjusting the pressure settings, run the compressor to verify whether the motor stops at the desired cut-out point.
Reconnect power and let your compressor run. Watch a calibrated pressure gauge on your tank. When air pressure climbs to your cut-out point, the compressor motor should shut off. The pump stops. When pressure drops to your cut-in point, the motor should start back up again. The pump runs.
Run through several cycles. Make sure the electrical circuit is working smoothly. Watch for heat buildup and listen for any odd sounds. If your compressor produces strange noises or runs too hot, something’s off. Check your pressure range and your differential again. Most machines operate properly between 80 and 120 psi, but your specific model might have a different range. If you keep adjusting and things still don’t feel right, you might need a new switch or a pressure relief valve check.
Troubleshooting Pressure Switch Issues
Short cycling happens when your compressor starts and stops too fast. Usually your differential is too small or your cut-in pressure is set too high. Air leaks also cause this—pressure drops fast and the motor keeps kicking back on. Check your connections and drain valve.
Unstable pressure means your gauge bounces around. Worn electrical contacts do this. So can incorrect settings or moisture in your system. Drain your tank regularly.
Failure to start or stop is serious. If your motor won’t turn on, check your power supply and electrical circuit. If it won’t shut off, your cut-out pressure might be too high or your contacts are stuck.
Sometimes adjustment fixes it. Sometimes you need a new switch. If your contacts are burned or your springs are damaged, replace it.
Maintenance, Safety, and Best Practices
Inspect your switch regularly for leaks and corrosion. Always disconnect power before servicing. Always drain your tank. Keep pressure settings as low as practical for your tools. Write down your cut-in and cut-out settings. Monitor them over time so you catch wear early.
Choosing the Right Pressure Switch
Fixed differential switches are simpler, while adjustable switches provide more control over pressure settings.
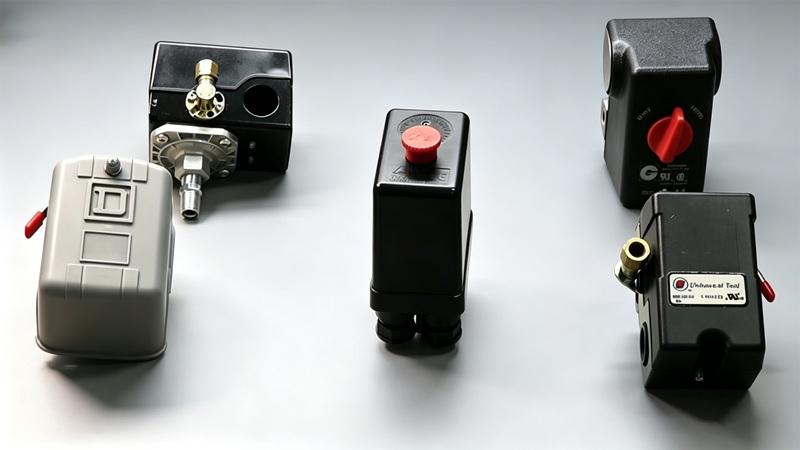
When choosing a pressure switch, check that the pressure range is above your cut-out point and make sure the electrical rating, including voltage and amperage, matches the power supply and compressor motor to help prevent contact burnouts.
The thread size and connection type should also match the tank fitting to avoid leaks. OEM switches are typically designed for a specific machine, while aftermarket options may cost less but may not perform the same way. Since air compressors are available in a variety of configurations, the right switch should always be matched to the system requirements.
Quick Setup Guide (Checklist)
- Disconnect power and drain your tank completely
- Remove the switch cover safely
- Set your desired cut-in pressure by turning the main adjustment screw clockwise to increase or counterclockwise to decrease
- Set your cut-out point using the differential screw—remember the gap between cut-in and cut-out is your differential pressure
- Make incremental changes only—a quarter turn at a time
- Reconnect power and run your compressor through several cycles
- Use a calibrated pressure gauge to confirm your cut-in and cut-out points are correct
- Watch for proper operation—motor starts at cut-in, shuts at cut-out, no short cycling
- Record your final pressure set points and differential in writing so you have the procedure documented for next time
- Note the model and date so you can track when adjustments were made
Conclusion
It’s a good idea to take your pressure system seriously. After all, is the brain of your compressor system. It senses air pressure, controls when your motor runs, and keeps everything operating within safe limits. Adjusting it means turning screws to shift your cut-in and cut-out points. Troubleshooting means checking for leaks, worn contacts, and incorrect settings when something goes wrong.
Getting the pressure right matters. The right settings keep your energy costs down, your tools working properly, and your machine lasting longer. Poor calibration burns money and creates wear that breaks parts early.
Always follow your manufacturer’s guidelines for your specific model. They know the range that works best. They know what pressure relief valve settings should be. They know the differential that makes sense for your machine. Your compressor came with instructions—use them.
Take time to adjust correctly. Check your work. Write down what you did. A few minutes now saves headaches later. If you need help troubleshooting or selecting the right setup, contact our team for expert support.